MPI
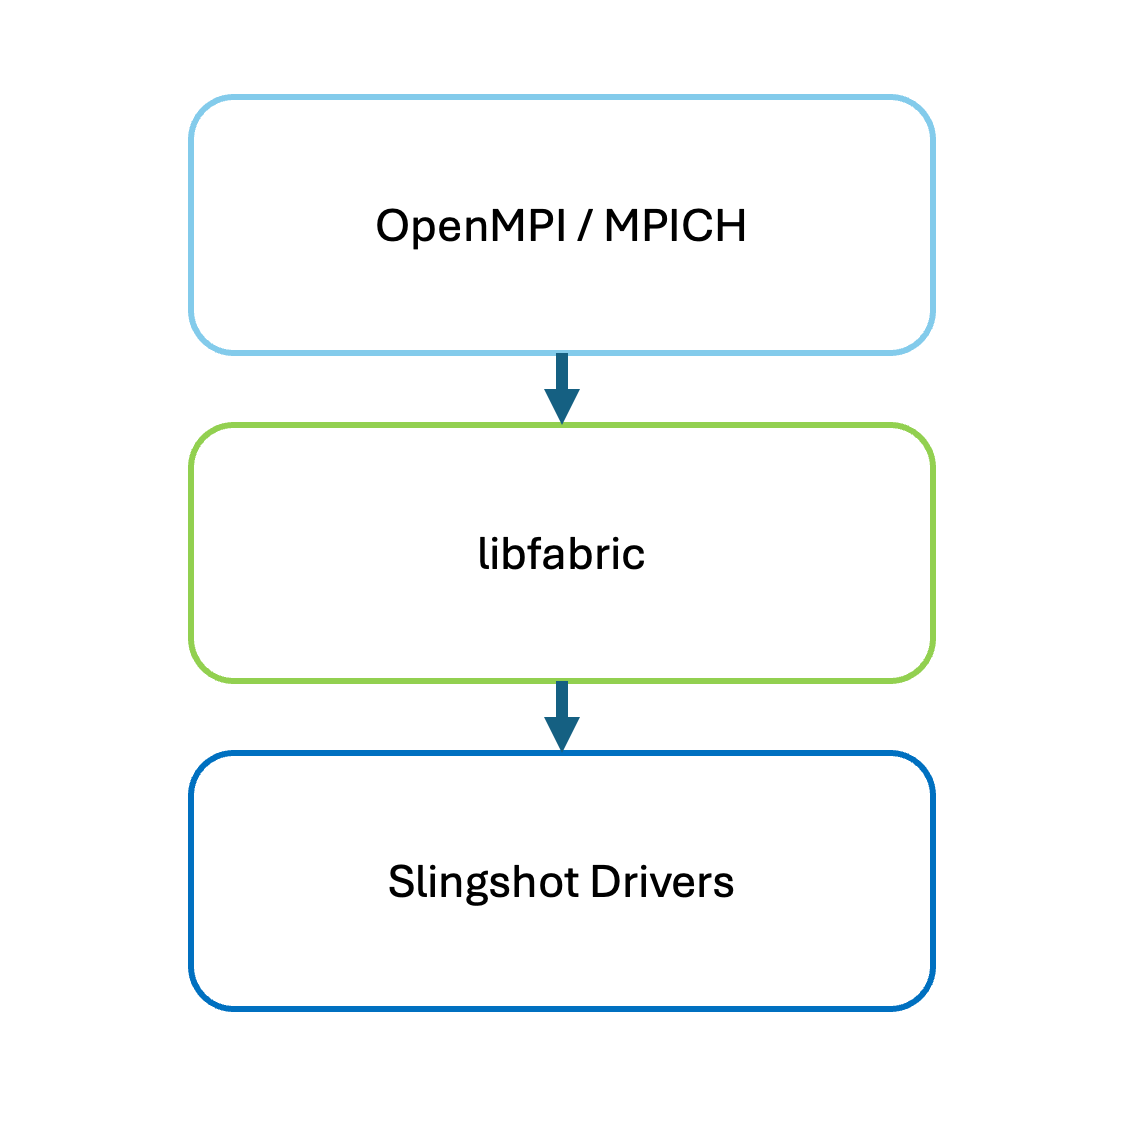
Message Passing Interface (MPI) is a standardized and portable communication protocol designed for parallel computing. For MPI to optimally work across a compute cluster, it must be able to communicate with the Network Interface Cards (NICs) and Switches. Isambard-AI is an HPE Cray EX system and Isambard 3 is a HPE Cray XD system, both based on the Slingshot 11 (SS11) interconnect.
For MPI to run on Isambard-AI or Isambard 3 it first needs to communicate with the standardised Fabric API provided through the libfabric module and libraries. libfabric will translate MPI commands to the Slingshot drivers.
Don't use mpirun or mpiexec
To execute your mpi_app you will have to implicitly launch it with srun as opposed to mpirun or mpiexec. This is so you can provide the correct PMI type with the --mpi flag.
Default MPI library (Cray MPICH)
Isambard supercomputers are built by HPE Cray and are based on the Slingshot interconnect. The Cray MPICH library is available for building MPI applications.
This MPI is provided by the cray-mpich module and is loaded as part of the Cray Programming Environment (CPE / PrgEnv-cray).
For instance, you can list the modules after loading PrgEnv-cray:
$ module list

    Currently Loaded Modules:
    1) brics/userenv/2.7   2) brics/default/1.0

$ module load PrgEnv-cray
$ module list

    Currently Loaded Modules:
    1) brics/userenv/2.7   5) craype-arm-grace     9) cray-libsci/26.03.0
    2) brics/default/1.0   6) libfabric/2.3.1     10) PrgEnv-cray/8.7.0
    3) cce/21.0.0          7) craype-network-ofi
    4) craype/2.7.36       8) cray-mpich/9.1.0
After loading a programming environment you can see the compiler link flags with mpicc -show:
$ mpicc -show
    craycc -I/opt/cray/pe/mpich/8.1.28/ofi/cray/17.0/include -L/opt/cray/pe/mpich/8.1.28/ofi/cray/17.0/lib -lmpi_cray
Here you can see that the the Cray MPI library -lmpi_cray will be linked
MPICH
Support for aarch64 in Cray MPICH was recently added and it is recommended to set some environment variables to avoid known issues in the current release.
Please see the Known Issues page for current advice on setting variables.
MPICH is also available through the GNU Programming environment PrgEnv-gnu:
$ module load PrgEnv-gnu
$ mpicc -show
craycc -I/opt/cray/pe/mpich/9.1.0/ofi/cray/20.0/include -L/opt/cray/pe/mpich/9.1.0/ofi/cray/20.0/lib -lmpi_cray -Wl,--whole-archive,-lhugetlbfs,--no-whole-archive
PMI (Process Manager Interface)
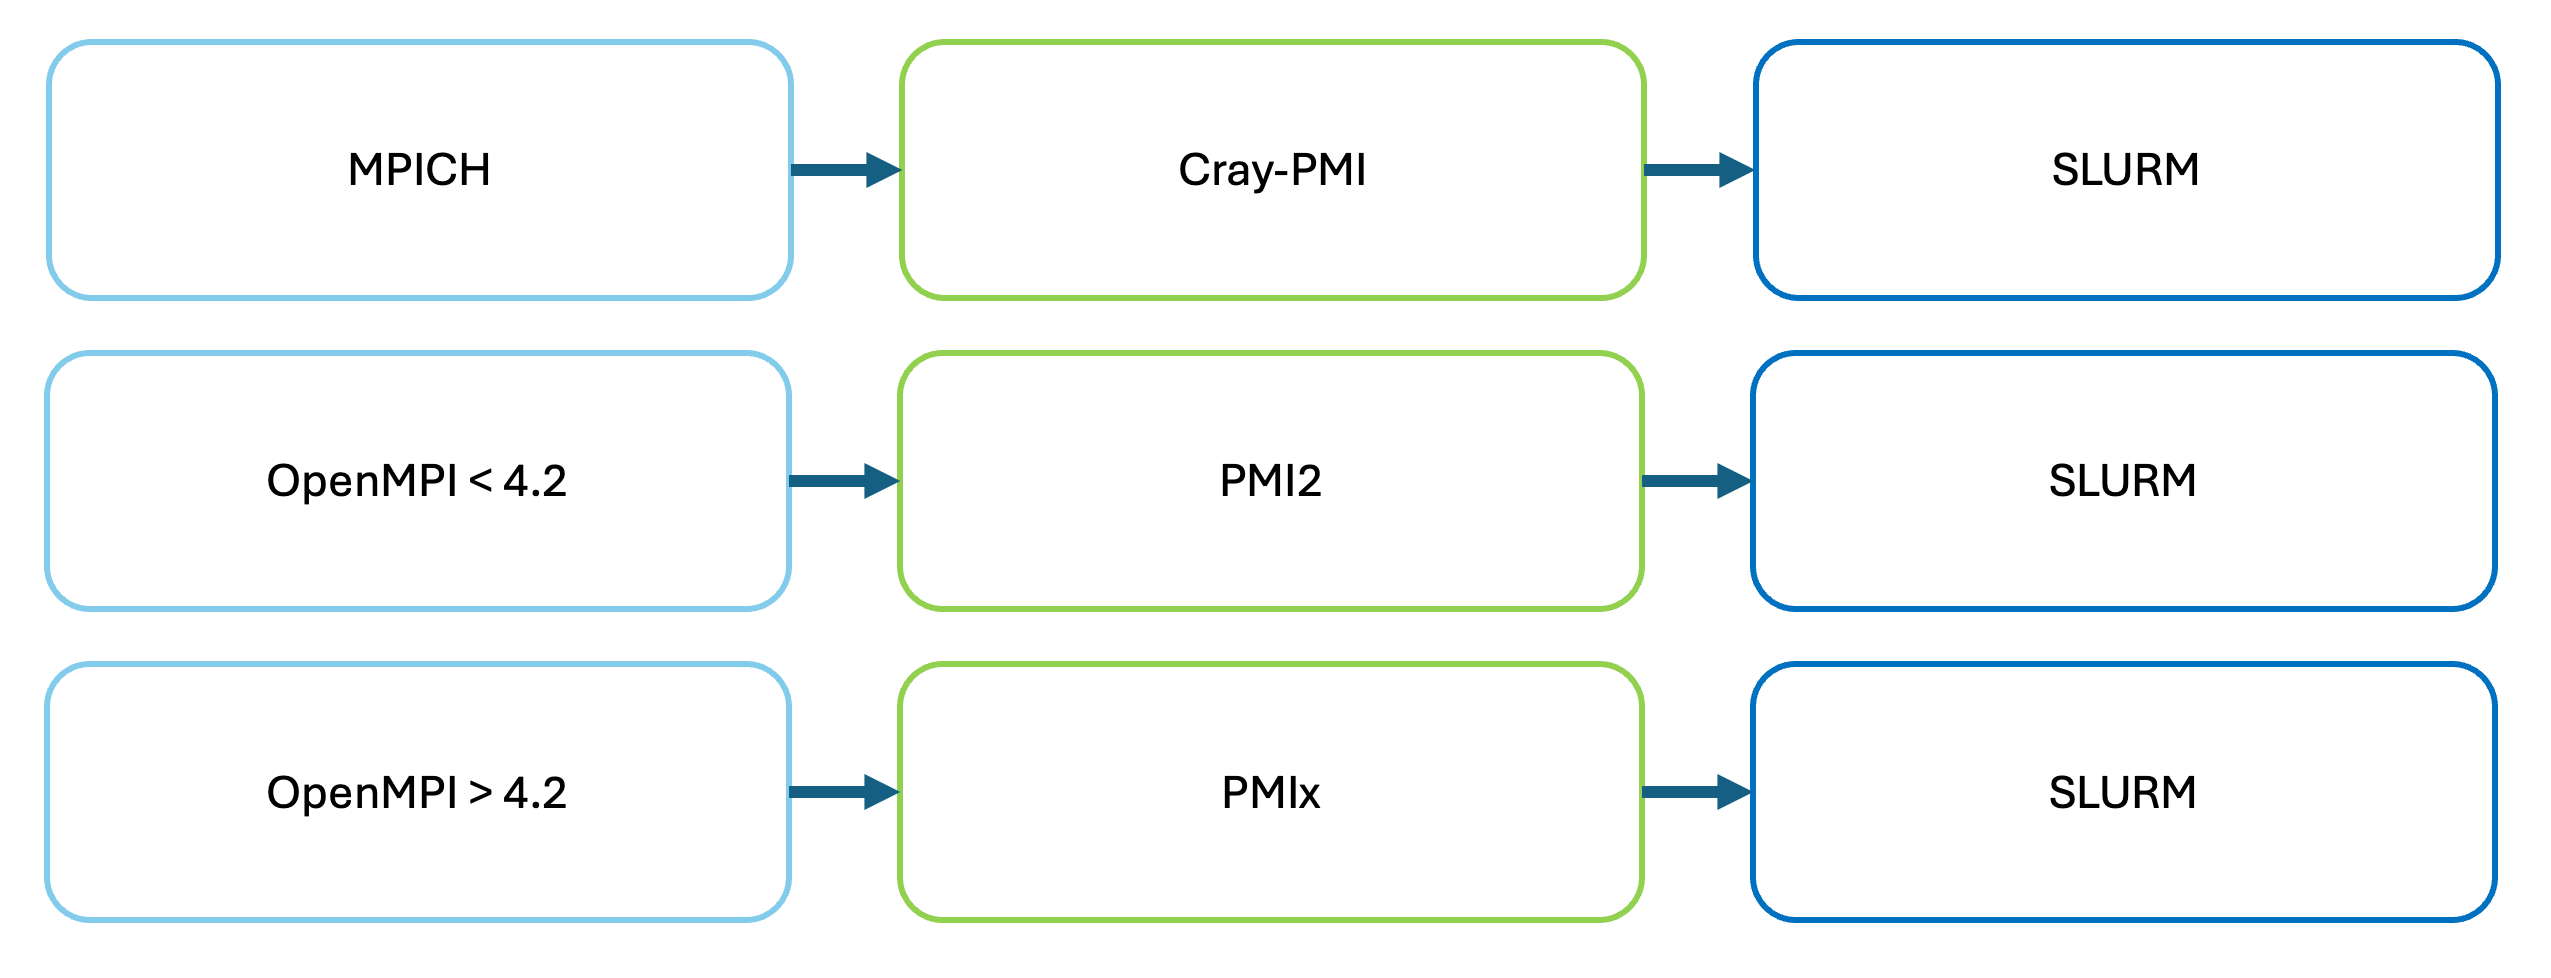
MPI processes need to communicate with the process manager (Slurm) to link the processes and decide ranks between the nodes. Many MPI versions separate the process management functions from the MPI implementation. For this a Process Management Interface (PMI) is required.
PMI for Cray MPICH
If you are using the default MPI library (Cray MPICH), then you should not need to specify the PMI type. If you are using an a different MPI library you have installed yourself, such as OpenMPI, you may need to use a different PMI type to the default.
PMI Types
To list the different PMIs available with Slurm you can run the following command:
$ srun --mpi=list
MPI plugin types are...
    cray_shasta
    none
    pmi2
    pmix
specific pmix plugin versions available: pmix_v4
If you are using Cray MPI (MPICH) you can use cray_shasta which is the default option.
If you are using an older version (<=v4.0) of OpenMPI you should use the pmi2 option:
Installing Different MPI Versions
You are welcome to build your own MPI versions from source on Isambard-AI or Isambard 3. However, conda can provide an easy method of installing MPI versions. Please have a look at our Conda instructions to get going with Conda Miniforge.
Install MPI with conda
A plain conda MPI install will not run across multiple nodes
Installing mpich or openmpi directly from conda-forge — for example conda install --channel conda-forge mpich — brings a self-contained MPI runtime.
That runtime does not know how to talk to the Slurm process manager or the Slingshot interconnect on Isambard.
When such an environment is launched with srun across more than one node, each process starts its own single-rank MPI world instead of joining one shared world.
Multi-node jobs then silently fail to communicate and waste the allocation.
The approaches below set conda up so that MPI works correctly across nodes.
The Python package mpi4py is used throughout this section as a concrete, easy-to-test MPI workload, but the same ideas apply to any conda-installed MPI application.
Three approaches are described, in order of recommendation:
- MPICH through the conda-forge external-MPI build — recommended for most users; simplest correct option with good performance.
- Building
mpi4pyfrom source against Cray MPICH — best performance; the right choice for production MPI workloads on Cray systems. - OpenMPI from conda-forge — only if your application specifically requires OpenMPI; not a supported configuration on Isambard.
All three are checked with the same short test program.
A minimal test program
Save the following as mpi_hello.py.
It confirms that every rank has joined one MPI world that spans all of the allocated nodes:
#!/usr/bin/env python3
"""Check that mpi4py forms a single MPI world spanning every rank and node."""

from collections import Counter
import socket
import sys

from mpi4py import MPI

comm = MPI.COMM_WORLD
rank = comm.Get_rank()
size = comm.Get_size()
host = socket.gethostname()

# Collective over every rank; the sum matches the world size only when
# all ranks (including those on other nodes) take part.
total = comm.allreduce(1, op=MPI.SUM)

# Gather each rank's host on rank 0 to show the rank-to-node mapping.
hosts = comm.gather(host, root=0)

if rank != 0:
    sys.exit(0)

ranks_per_host = Counter(hosts)
print(f"MPI library: {MPI.Get_library_version().splitlines()[0]}")
print(f"world size: {size}")
print(f"allreduce sum: {total} (expected {size})")
print(f"nodes in world: {len(ranks_per_host)}")
for name, count in sorted(ranks_per_host.items()):
    print(f"  {name}: {count} ranks")

if size > 1 and total == size:
    print("RESULT: PASS - one MPI world spans every rank")
    sys.exit(0)

print("RESULT: FAIL - ranks did not join a single MPI world")
sys.exit(1)
On a working multi-node launch it prints RESULT: PASS together with the rank-to-node mapping.
If the setup is broken, every process instead reports world size: 1 and RESULT: FAIL, because the processes never formed a shared world.
MPICH (recommended)
conda-forge publishes external builds of MPICH that contain no MPI runtime of their own and bind to a system MPICH at run time (see the conda-forge notes on external MPI libraries).
Because Cray MPICH is MPICH ABI-compatible, an environment built this way uses the vendor Cray MPICH — and therefore the Slingshot interconnect — while mpi4py and the rest of your stack still come from conda.
Create the environment by requesting the external_* build of mpich from the mpi-external channel label:
conda create --name mpi4py-mpich \
    --channel conda-forge/label/mpi-external \
    --channel conda-forge \
    mpi4py "mpich=*=external_*"
Submit the job with the script below.
It loads the Cray programming environment, activates the conda environment, points the dynamic linker at the Cray MPICH ABI libraries, and launches with srun:
#!/usr/bin/env bash
#SBATCH --job-name=mpi4py-mpich
#SBATCH --nodes=2
#SBATCH --ntasks-per-node=4
#SBATCH --cpus-per-task=1
#SBATCH --time=00:01:00
#SBATCH --output=mpi4py-mpich-%j.out

set -euo pipefail

# Load the Cray programming environment so the vendor MPICH runtime,
# libfabric, and Slurm PMI libraries are available.
module reset
module load PrgEnv-gnu

# Activate the conda environment created above.
# adjust this line to where your conda is located
source ~/miniforge3/bin/activate
conda activate mpi4py-mpich

# Prepend the Cray MPICH ABI-compatible libraries so the dynamic linker
# loads the vendor MPI runtime in place of the conda placeholder.
export LD_LIBRARY_PATH="${MPICH_DIR}/lib-abi-mpich:${LD_LIBRARY_PATH:-}"

srun --ntasks 8 --ntasks-per-node 4 --cpus-per-task 1 --cpu-bind cores \
    python mpi_hello.py
A successful two-node run reports one MPI world spanning both nodes:
MPI library: MPI VERSION    : CRAY MPICH version 8.1.30.9 (ANL base 3.4a2)
world size: 8
allreduce sum: 8 (expected 8)
nodes in world: 2
  x3003c0s13b4n0: 4 ranks
  x3003c0s15b1n0: 4 ranks
RESULT: PASS - one MPI world spans every rank
Cray MPICH ABI compatibility is convenient, not optimal
This approach runs on the vendor MPI through the MPICH ABI, so it uses the Slingshot interconnect correctly, but it is not as well optimised as an MPI built specifically for the system.
For production workloads where MPI performance matters, build mpi4py from source.
Building mpi4py from source against Cray MPICH
For the best performance, build mpi4py from source so that it links directly against the vendor Cray MPICH, libfabric, and Slingshot libraries.
Create a minimal conda environment with only Python and pip, then build mpi4py from source using the Cray compiler wrapper cc, which links Cray MPICH automatically:
module reset
module load PrgEnv-gnu

conda create --name mpi4py-source python pip
conda activate mpi4py-source

MPICC="cc -shared" python -m pip install \
    --force-reinstall --no-cache-dir --no-binary mpi4py mpi4py
Submit the job as for the MPICH approach, but without the LD_LIBRARY_PATH line — the build is already linked against the Cray libraries:
#!/usr/bin/env bash
#SBATCH --job-name=mpi4py-source
#SBATCH --nodes=2
#SBATCH --ntasks-per-node=4
#SBATCH --cpus-per-task=1
#SBATCH --time=00:01:00
#SBATCH --output=mpi4py-source-%j.out

set -euo pipefail

# Load the same Cray programming environment used for the build so the
# linked Cray MPICH libraries are found at run time.
module reset
module load PrgEnv-gnu

# adjust this line to where your conda is located
source ~/miniforge3/bin/activate
conda activate mpi4py-source

srun --ntasks 8 --ntasks-per-node 4 --cpus-per-task 1 --cpu-bind cores \
    python mpi_hello.py
GPU-aware builds on Isambard-AI
To build CUDA-aware mpi4py for direct GPU-to-GPU communication on Isambard-AI, additional CUDA modules and build flags are needed.
OpenMPI
OpenMPI from conda is not a supported configuration on Isambard
Running conda OpenMPI with srun does not work correctly.
The launcher flags required for multi-node operation — such as --prtemca ras slurm --prtemca plm slurm and placement options like ppr:4:node:PE=1 — are complex and error-prone.
Testing behind this guide could not confirm that this configuration uses the Slingshot interconnect; the evidence pointed to a slower, general-purpose network path.
Use this approach only if your application specifically requires OpenMPI and you cannot use a source build.
For other ways to build OpenMPI yourself, see the OpenMPI v5 build instructions and the legacy OpenMPI build instructions.
Some applications require OpenMPI specifically. It can be installed from conda-forge as usual:
Unlike Cray MPICH, this OpenMPI cannot be launched with srun on Isambard.
It must be launched with its own mpirun, told to use Slurm for both resource allocation and process launch:
#!/usr/bin/env bash
#SBATCH --job-name=mpi4py-openmpi
#SBATCH --nodes=2
#SBATCH --ntasks-per-node=4
#SBATCH --cpus-per-task=1
#SBATCH --time=00:01:00
#SBATCH --output=mpi4py-openmpi-%j.out

set -euo pipefail

# OpenMPI from conda-forge ships its own runtime, so do not load the Cray
# programming environment here.
module reset

# adjust this line to where your conda is located
source ~/miniforge3/bin/activate
conda activate mpi4py-openmpi

# Launch with OpenMPI's own mpirun. The --prtemca options tell its PRRTE
# launcher to obtain the node list from Slurm and to start ranks through
# Slurm. --map-by places 4 ranks per node, one core each.
mpirun --prtemca ras slurm --prtemca plm slurm \
    --np 8 --map-by ppr:4:node:PE=1 --bind-to core \
    python mpi_hello.py