- ✗ AIP1 Isambard-AI Phase 1 unsupported
- ✓ AIP2 Isambard-AI Phase 2 supported
- ✗ I3 Isambard 3 unsupported
- ✗ BC5 BlueCrystal 5 unsupported
Distributed PyTorch Training
Abstract
This tutorial aims to introduce dispatching a distributed training job on Isambard-AI. It is meant to bridge the gap between training on a single node to distributing jobs across multiple nodes. High Performance Computing (Slurm) knowledge is not required.
Prerequisites
We welcome people from all domain backgrounds that have experience training AI models with Data Parallelism on PyTorch.
A working uv installation is required to setup the environment, the instructions can be followed in the uv guide.
Learning Objectives
The learning objectives of this tutorial are as follows:
- Be able to launch a distributed PyTorch job.
- Understand how Slurm, MPI, and NCCL interact.
- Understand how MPI and NCCL are dispatched and the modules required for them.
- Combine the above to make use of the high speed network (Slingshot).
Tutorial Contents
Tutorial
1. Introduction and Setup
Training large AI models on a single GPU has two limitations. The model may not fit into the GPU's memory, or training on a large dataset may simply take too long. Distributed training addresses both by spreading the work across multiple GPUs and/or nodes. This makes it possible to train models that would otherwise be impossible - for example, this may circumvent common CUDA errors such as "out of memory" (OOM) errors.
Distributed training jobs differ according to the infrastructure of the underlying system. This tutorial will introduce how to launch multi-node jobs on Isambard-AI to make use of the Slingshot 11 High Speed Network (hsn) using MPI (Message Passing Interface) and NCCL (Nvidia Collective Communications Library).
Distributed PyTorch is based around the torch.distributed Python module. It is very similar to other parallel computing methods such as MPI.
PyTorch will launch MPI processes behind the scenes. However, torch has to assign a GPU to each process and connect them using NCCL.

PyTorch torch.distributed.launch vs. torchrun
PyTorch used to provide the command line tool torch.distributed.launch which has moved to torchrun.
Please see the PyTorch distributed documentation for transitioning to the torchrun command.
Scheduled Tutorials
For in-person tutorials, attendees should wait for instructions on the reservation information and setting up the uv environment.
-
Create a directory for this tutorial:
-
Use our pre-built environment:
-
Verify the environment works, replacing
This should print<YOUR_RESERVATION>with the reservation name for your workshop:Trueto the terminal.
You can now skip to the Understanding the backend section.
Setting up the environment
Please ensure that no Conda environment is activated.
First, we create a working directory for this tutorial. Inside this folder, we create our uv environment.
We can install our dependencies and activate the environment by executing the following commands.
We then test GPU capability by printing cuda availability.
Installing ML Applications
More information on ML applications and frameworks is available in the ML Applications Documentation
2. Understanding the backend
A distributed job runs many separate processes across multiple machines.
MPI is the standard these processes use to coordinate and exchange data; it assigns each process a unique ID called its "rank".
The Nvidia Collective Communications Library (nccl) provides collectives (e.g. All Reduce) for efficient GPU-to-GPU communication. For in-depth information on how PyTorch uses MPI and NCCL for collectives please see the PyTorch distributed documentation.
Launching jobs with srun
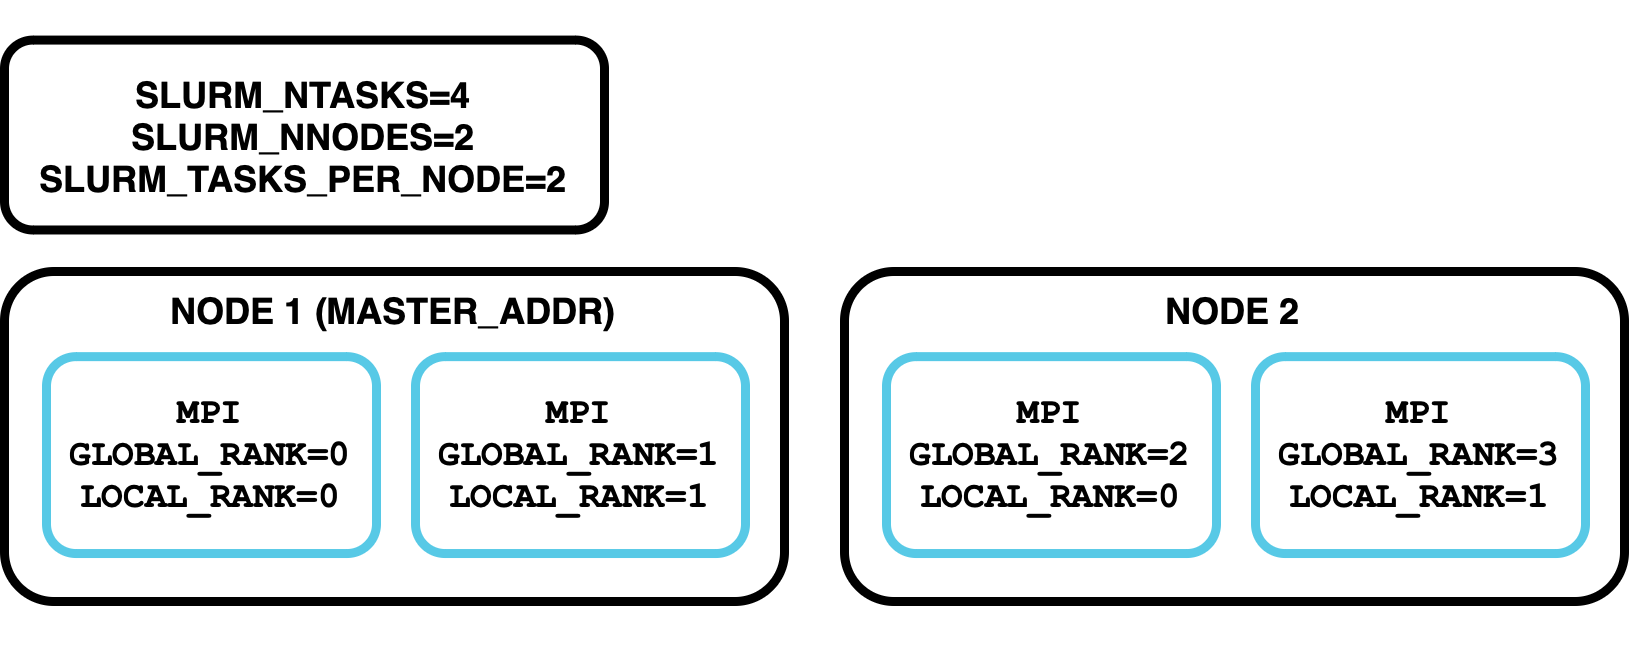
To run on multiple nodes we must use the process manager (Slurm) srun command. It manages the distribution of processes across multiple nodes, leveraging the process manager's capabilities. By using the below command, you can execute a job across two nodes, with each node running the specified command.
What environment variables does Slurm set on the different processes?
Try running srun --nodes=2 env | grep SLURM and have a look at which environment variables are set for each process.
MPI and Slurm Documentation
For more background the MPI and PMI documentation is available here: MPI Guide.
Our Slurm Documentation will explain more about how to use srun and sbatch commands.
PyTorch distributed
PyTorch's torch.distributed module simplifies launching distributed training jobs.
To demonstrate a simple distributed setup, we can use a Python script named launch.py that initializes a distributed process group and prints the global and local ranks of each process.
Here is the content of launch.py:
"""
An example script illustrating distributed training.
"""
import os
import torch.distributed as dist
import torch.multiprocessing as mp


def init_process(rank, world_size, fn, backend="gloo"):
    """
    An entry point for a process in distributed training.

    Runs the function fn(rank, world_size) and connects the process to a process group.
    """
    dist.init_process_group(backend, rank=rank, world_size=world_size)
    fn(rank, world_size)


def say_hello(rank, world_size):
    """
    An example function: just prints some stuff to the terminal.
    """
    print(
        f"Hello from rank {rank} out of {world_size} processes on {os.uname().nodename}"
    )
    dist.destroy_process_group()


if __name__ == "__main__":
    world_size = int(os.environ["WORLD_SIZE"])
    mp.spawn(
        init_process, args=(world_size, say_hello, "gloo"), nprocs=world_size, join=True
    )
Click here to download the file: launch.py
This script illustrates how PyTorch multiprocessing and distributed training work:
init_process(): Initializes the distributed environment using the specified backend. Executes the provided functionfn()for each process.say_hello(): Prints a message from each process, indicating its rank and the total number of processes. Cleans up the process group after execution."__main__": Retrieves the total number of processes from theWORLD_SIZEenvironment variable. Usesmp.spawnto launch multiple processes, each running theinit_process()function.
You can run this script with the following command, note that the node id (nid) may differ for you:
This command will launch 2 processes on the login node, and each process will print its rank and the total number of processes.
MASTER_ADDR: The address of the master node (in this case,localhost). This is the hostname of the machine where the master process is running. On Isambard-AI this will resolve to the node name (e.g.nidXXXXXX) and we will show you below how to set this.MASTER_PORT: The port on the master node to which the worker nodes will connect (in this case, 29600). This helps in establishing communication between the master and worker nodes.WORLD_SIZE: The total number of processes participating in the job (in this case, 2). This includes both the master and worker processes.
We set these environment variables manually in this example, however, PyTorch will pick up some environment variables from MPI/Slurm.
The gloo backend
The gloo backend is used in this example for simplicity. The gloo backend is suitable for CPU-based distributed training and is included in the standard PyTorch installation.
By using the gloo backend, you can easily test and understand the basics of distributed training without the complexity of setting up MPI.
3. Our first distributed job
To demonstrate how the network impacts performance, we will run a training benchmark of the BERT model. We will be using PyTorch's Distributed Data Parallel functionality which uses torch.multiprocessing under the hood.
This is an example of data parallelism: every GPU has a full copy of the model and trains on a different slice of the batch, syncing gradients each step.
"""
Benchmark training BERT on some synthetic data.

This script expects to be launched once per GPU, from a Slurm submission script
with the necessary environment variables set.

"""

import torch
import transformers
from transformers import BertTokenizer, BertForSequenceClassification
from huggingface_hub import snapshot_download
from torch.nn.parallel import DistributedDataParallel as DDP
import torch.distributed as dist
import time
from datetime import timedelta
import os

transformers.utils.logging.set_verbosity_error()

MODEL_ID = "bert-base-uncased"
CACHE_DIR = "/projects/public/brics/cache"  # Use pre-downloaded models
BACKEND = "gloo"  # change to 'nccl' to use NCCL backend
BATCH_SIZE = 32
NUM_SAMPLES = 64  # Total number of samples to process
TRAINING_STEPS = NUM_SAMPLES // BATCH_SIZE
DEVICE = f"cuda:{os.environ['LOCAL_RANK']}"


def init_process(backend):
    """
    Initialise distributed training with the provided backend.

    The world size and local rank are discovered from environment variables.
    """
    print(
        f"Initializing distributed training rank {os.environ.get('RANK')} with backend: {backend} on device: {DEVICE}"
    )
    # Join this process to the process group, using the specified backend
    dist.init_process_group(
        backend=backend,
        timeout=timedelta(seconds=60 * 5),
        world_size=int(os.environ["WORLD_SIZE"]),
    )
    torch.cuda.set_device(int(os.environ["LOCAL_RANK"]))

    # We only want to print this once; only do so in the main process (i.e. the one with global rank 0)
    if dist.get_rank() == 0:
        world_size = dist.get_world_size()
        print(
            f"Distributed training initialized with {world_size} processes using backend {backend}."
        )


def benchmark():
    """
    Run a simple training-loop benchmark on synthetic data.

    Each rank (process) runs on a slice of the global batch.
    Reports the total wall-clock time (from rank 0).

    The number of training steps is specified in TRAINING_STEPS (see the top of this file).
    """
    # The BERT model is pre-downloaded
    model_path = snapshot_download(
        repo_id=MODEL_ID, cache_dir=CACHE_DIR, local_files_only=True
    )
    tokenizer = BertTokenizer.from_pretrained(model_path)

    # Find the local and global ranks of the current process
    local_rank = int(os.environ["LOCAL_RANK"])
    rank = dist.get_rank()
    world_size = dist.get_world_size()

    # Split the batch size evenly across ranks
    # This assumes the batch size is exactly divisible by the world size (number of processes)
    per_gpu_batch_size = BATCH_SIZE // world_size
    if per_gpu_batch_size * world_size != BATCH_SIZE:
        raise ValueError(
            f"{BATCH_SIZE=} but {world_size=}; BATCH_SIZE must be an exact multiple of world size.\n"
            f"Instead, {BATCH_SIZE/world_size=}"
        )

    # Only print this once per training run
    # i.e. print it only with the first (global rank == 0) process
    if rank == 0:
        print(
            f"Running benchmark with world size: {world_size}, batch size: {BATCH_SIZE}, per GPU batch size: {per_gpu_batch_size}, training steps: {TRAINING_STEPS}"
        )

    # Get the model into this process' GPU, then wrap it with DDP (distributed data parallel)
    # This tells us to synchronise gradients from all our processes during the backwards pass
    model = BertForSequenceClassification.from_pretrained(model_path).to(DEVICE)
    model = DDP(model, device_ids=[local_rank])
    optimizer = torch.optim.Adam(model.parameters())

    # Separate data per worker
    start_idx = local_rank * per_gpu_batch_size
    end_idx = start_idx + per_gpu_batch_size
    # Create synthetic training data
    texts = [
        f"This is sample sentence {i} for benchmarking BERT."
        for i in range(start_idx, end_idx)
    ]
    inputs = tokenizer(
        texts,
        return_tensors="pt",
        padding=True,
        truncation=True,
        use_fast_tokenizer=True,
    )
    inputs = {k: v.to(DEVICE) for k, v in inputs.items()}
    labels = torch.ones(per_gpu_batch_size, dtype=torch.long).to(DEVICE)

    # Wait for all ranks to finish before we start timing
    dist.barrier()
    start_time = time.time()

    for _ in range(TRAINING_STEPS):
        optimizer.zero_grad()
        outputs = model(**inputs, labels=labels)  # forward pass
        loss = outputs.loss
        loss.backward()  # backward pass
        optimizer.step()

    # Wait for all ranks to finish before we stop timing
    dist.barrier()
    end_time = time.time()

    # Only report the time in the main process
    if dist.get_rank() == 0:
        print(
            f"Time taken for {TRAINING_STEPS} forward and backward pass(es) with BATCH_SIZE={BATCH_SIZE} on {world_size} workers: {end_time - start_time} seconds"
        )


if __name__ == "__main__":
    init_process(BACKEND)
    benchmark()
    dist.destroy_process_group()
Click here to download the file: train.py
Just like above we set up an init_process() and a fn() function (here named benchmark()). Executing both of them in the main section:
init_process(): Initializes the distributed environment using the specified backend (glooornccl). Sets the CUDA device for the current process based on theLOCAL_RANKenvironment variablebenchmark():- Loads a pre-trained BERT model and tokenizer.
- Wraps the model with
DistributedDataParallel(DDP) for distributed training. - Prepares a batch of sample text and dummy labels.
- Measures the time taken for one forward and backward pass through the model.
- Prints the benchmark result from the process with rank
0.
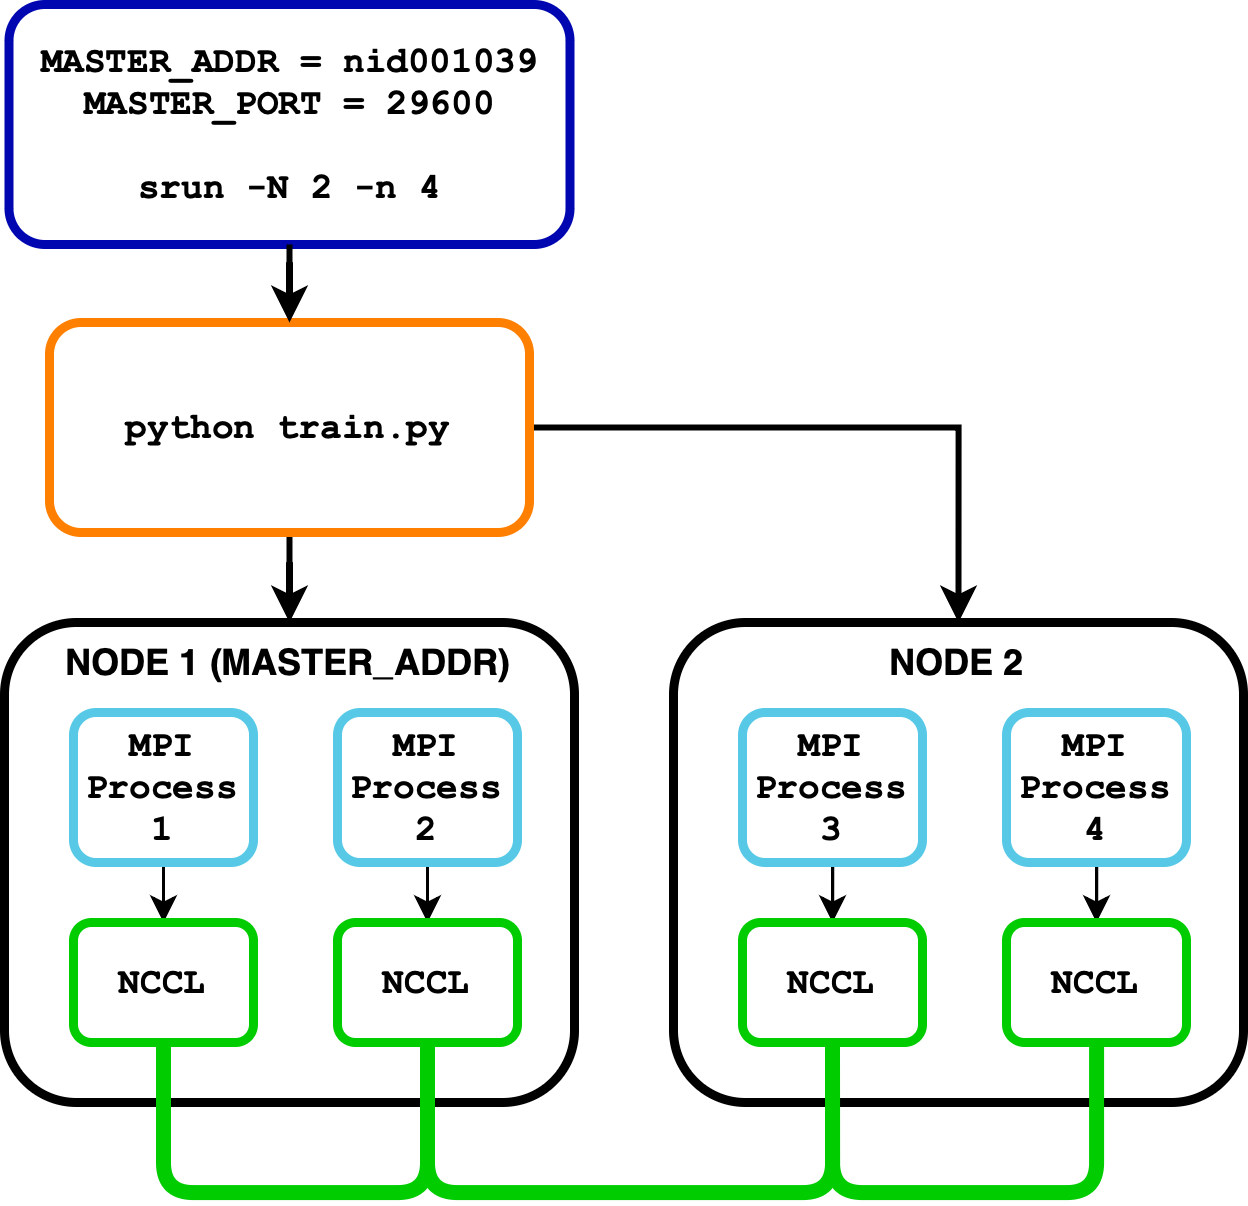
Now that we have a benchmark script, the following batch script explains how to launch the benchmark on Isambard-AI, including #SBATCH directives and srun arguments. We use scontrol to set the MASTER_ADDR automatically. Note that the arguments have to be set in both the sbatch directives and the srun command.
#!/bin/bash
#SBATCH --job-name=Torch_Distributed
#SBATCH --nodes=2
#SBATCH --gpus=8
#SBATCH --time=00:10:00
#SBATCH --ntasks-per-node=4

module load brics/nccl brics/aws-ofi-nccl
source .venv/bin/activate

export MASTER_ADDR=$(scontrol show hostname $SLURM_NODELIST | head -n 1) # e.g. nid001038
export MASTER_PORT=29600

echo "Job Started at $(date)"

# Run the function with srun
srun --nodes=2 \
    --gpus=8 \
    --mpi=pmi2 \
    --ntasks-per-node=4 \
    bash -c 'export WORLD_SIZE=$SLURM_GPUS; export RANK=$PMI_RANK; export LOCAL_RANK=$SLURM_LOCALID; python3 train.py'

echo "Job Finished at $(date)"
Click here to download the file: sbatch_pytorch.sh
To run our job we can simply execute:
We can then find the output in the file slurm-XXXXX.out where XXXXX is your job ID, the output should resemble:
Job Started at [DATE]
Initializing distributed training rank 1 with backend: gloo on device: cuda:0
Initializing distributed training rank 0 with backend: gloo on device: cuda:0
Distributed training initialized with 2 processes using backend gloo.
Running benchmark with world size: 2, batch size: 32, per GPU batch size: 16, training steps: 2
Time taken for 2 forward and backward pass(es) with BATCH_SIZE=32 on 2 workers: [GLOO_RESULT] seconds
Job Finished at [DATE]
Make a note of the performance.
Using the nccl backend
We can now change the line BACKEND = 'gloo' to use the 'nccl' backend in the top of train.py.
Check your slurm-XXXXX.out file for the result:
...
Time taken for 2 forward and backward pass(es) with BATCH_SIZE=32 on 2 workers: [NCCL_RESULT] seconds
...
nccl vs. gloo
How does the performance change between the different backends? What if the batch size is increased?
Answer
You should notice that training with NCCL is significantly faster than with Gloo. This is because NCCL is built specifically for NVIDIA GPUs and communicates directly between them using the high-speed Slingshot network; Gloo is a CPU-oriented backend that has to copy data through CPU memory first.
You can now try scaling up beyond two nodes. The high speed network provides both low-latency and high-bandwidth suitable for your desired model size and batch size.
4. Conclusion
In this tutorial, you've learned how to launch distributed PyTorch training jobs on Isambard-AI's high-speed network. We covered how Slurm orchestrates processes across nodes, how MPI provides the initial process rankings, and how NCCL enables efficient GPU-to-GPU communication. You've seen how switching from the gloo to nccl backend can significantly improve training performance by leveraging the Slingshot network.
MPI is only used to set up the process ranks, the backend is then taken over by NCCL to enable GPU collectives. NCCL will bypass the CPU, and facilitate the GPUs to communicate directly to each other without the operating system interfering. This process is known as RDMA (Remote Direct Memory Access), and dramatically decreases the latency and increases the bandwidth, ensuring your job scales as the model size and batch size increase.
DistributedDataParallel (DDP) works by combining PyTorch's multiprocessing (torch.multiprocessing) and distributed (torch.distributed) modules. When you wrap a model with DDP, it creates replicas of your model across different processes, each assigned to a specific GPU. During training, gradients are automatically synchronized across all processes using NCCL's efficient GPU-to-GPU communication primitives. This synchronisation happens in the backward pass, ensuring all model replicas maintain identical parameters.
Checklist for HSN (High Speed Network) Usage
Before running your distributed job, ensure:
- Loaded required modules:
module load brics/nccl. - Using NCCL backend:
backend=ncclininit_process_group(). MASTER_ADDRis set correctly usingexport MASTER_ADDR=$(scontrol show hostname $SLURM_NODELIST | head -n 1).- Each process has been assigned to correct GPU using
LOCAL_RANK.
Debugging NCCL
Set NCCL_DEBUG=INFO in your environment to see detailed information about NCCL initialisation and communication:
This will help verify you're using the HSN and diagnose any communication issues.
PMI Types
Note that the environment variables depend on the PMI and MPI version you use according to the table below.
| Environment Variable | --mpi=cray_shasta |
--mpi=pmi2 |
--mpi=pmix |
|---|---|---|---|
| World Size | SLURM_NTASKS | SLURM_NTASKS | SLURM_NTASKS |
| Number of Nodes | SLURM_NNODES | SLURM_NNODES | SLURM_NNODES |
| Global Rank | PMI_RANK | PMI_RANK | PMIX_RANK |
| Node Rank | SLURM_NODEID | SLURM_NODEID | SLURM_NODEID |
| Local Rank | SLURM_LOCALID | SLURM_LOCALID | SLURM_LOCALID |
Note: Containers
All the above is applicable for containers given you follow the multi-node container documentation