- ✗ AIP1 Isambard-AI Phase 1 unsupported
- ✓ AIP2 Isambard-AI Phase 2 supported
- ✗ I3 Isambard 3 unsupported
- ✗ BC5 BlueCrystal 5 unsupported
Relion
Prerequisites
- Have followed the container instructions for Apptainer.
Relion is a popular application for cryo electron-microscopy (cryo-EM) structure determination. On Isambard-AI we recommend that you use a container for access to up-to-date dependencies. We base the container on nvidia/cuda:12.8.0-devel-ubuntu24.04
To install relion let's first create a relion.def container definition file and insert the following:
Bootstrap: docker
From: nvidia/cuda:12.8.0-devel-ubuntu24.04
%environment
    export PATH="/opt/ctffind/bin:/opt/relion/bin:/opt/conda/bin:${PATH}"
    export TORCH_HOME="/opt/torch/"
    export PATH="/opt/conda/envs/relion-5.0/bin:${PATH}"
    export CONDA_DEFAULT_ENV="relion-5.0"
    export SLURM_CONF="/opt/relion/etc/slurm.conf"
    export RELION_QSUB_TEMPLATE="/opt/relion/etc/qsub_template.sh"
    export RELION_QUEUE_USE="true"
    export RELION_QUEUE_NAME="workq"
    export RELION_MPI_MAX="8"
    export RELION_THREAD_MAX="16"
    export RELION_MINIMUM_DEDICATED="1"
    export RELION_ERROR_LOCAL_MPI="4"
    export RELION_QSUB_EXTRA_COUNT="3"
    export RELION_QSUB_EXTRA1="Walltime"
    export RELION_QSUB_EXTRA1_DEFAULT="4:00:00"
    export RELION_QSUB_EXTRA2="Number of nodes"
    export RELION_QSUB_EXTRA2_DEFAULT="1"
    export RELION_QSUB_EXTRA3="GPUs per node"
    export RELION_QSUB_EXTRA3_DEFAULT="4"

%post
    export DEBIAN_FRONTEND=noninteractive
    export PATH="/opt/relion/bin:/opt/conda/bin:${PATH}"
    export TORCH_HOME="/opt/torch/"
    apt-get update && apt install -y curl wget cmake git build-essential mpi-default-bin mpi-default-dev gfortran libfftw3-dev libtiff-dev libpng-dev ghostscript libxft-dev libwxgtk3.2-dev libx11-dev libxext-dev libxrender-dev libgl1-mesa-dev libxcb-xinerama0 libxcb-cursor0 libxkbcommon-x11-0 libdbus-1-3
    # Install CTFFIND
    export CTFFIND_URL="https://grigoriefflab.umassmed.edu/sites/default/files/ctffind-4.1.14.tar.gz"
    wget ${CTFFIND_URL} && tar -xzf ctffind-4.1.14.tar.gz && rm ctffind-4.1.14.tar.gz && cd ctffind-4.1.14
    # Patch ctffind source code
    CTFFIND_FILE="src/programs/ctffind/ctffind.cpp"
    sed -i -e 's/\bbool ComputeRotationalAverageOfPowerSpectrum/void ComputeRotationalAverageOfPowerSpectrum/g' -e 's/\bbool RescaleSpectrumAndRotationalAverage/void RescaleSpectrumAndRotationalAverage/g' "$CTFFIND_FILE"
    MATRIX_FILE="src/core/matrix.cpp"
    sed -i -e 's|#define _AL_SINCOS(x, s, c)  __asm__ ("fsincos" : "=t" (c), "=u" (s) : "0" (x))|#define _AL_SINCOS(x, s, c)  do { (s) = sinf(x); (c) = cosf(x); } while(0)|' -e 's|#define FLOATSINCOS(x, s, c)  _AL_SINCOS((x) * AL_PI / 128.0, s ,c)|#define FLOATSINCOS(x, s, c)  _AL_SINCOS((x) * AL_PI / 128.0f, s, c)|' "$MATRIX_FILE"
    # Build ctffind
    mkdir build && cd build
    ../configure --prefix="/ctffind" --enable-static --disable-debug --enable-optimisations --enable-openmp FC=gfortran F77=gfortran CXXFLAGS="-g -O2 -Wno-maybe-uninitialized -Wno-error=maybe-uninitialized" CFLAGS="-g -O2 -Wno-maybe-uninitialized -Wno-error=maybe-uninitialized"
    make -j 72 && make install
    cd ../.. && rm -rf ctffind-4.1.14
    # Install Miniforge Conda
    curl --location --remote-name "https://github.com/conda-forge/miniforge/releases/latest/download/Miniforge3-$(uname)-$(uname -m).sh"
    bash Miniforge3-$(uname)-$(uname -m).sh -b -p /opt/conda && rm Miniforge3-$(uname)-$(uname -m).sh
    # Install Relion
    git clone -b ver5.0 https://github.com/3dem/relion.git && cd relion
    # patch conda environment file
    sed -i 's/^\(      \)- napari\[all\]/\1# - napari[all]/' environment_blackwell.yml
    sed -i 's/^\(      \)- tsnecuda/\1# - tsnecuda/' environment_blackwell.yml
    sed -i 's/^\(      \)- git+/\1# - git+/' environment_blackwell.yml
    sed -i 's/^\(      \)- PyQt5/\1# - PyQt5/' environment_blackwell.yml
    sed -i 's/torchvision==0.22.1+cu128/torchvision/' environment_blackwell.yml
    sed -i '/^  - setuptools=/a\  - pyqt=5.15.9' environment_blackwell.yml
    sed -i 's/^\(      \)- "\.\[vis\]"/\1# - ".[vis]"/' environment_blackwell.yml
    cat environment_blackwell.yml
    # install pip dependencies
    conda env create --file environment_blackwell.yml
    . /opt/conda/etc/profile.d/conda.sh && conda activate relion-5.0
    # pip install ".[vis]"
    pip install git+https://github.com/3dem/relion-classranker git+https://github.com/3dem/relion-blush git+https://github.com/3dem/topaz
    conda deactivate
    # Build relion
    mkdir $TORCH_HOME && mkdir build && cd build
    cmake .. -DCMAKE_INSTALL_PREFIX=/opt/relion -DCUDA_ARCH=90 -DFETCH_WEIGHTS=OFF && make -j 72 && make install
    # Create config directory and embed slurm.conf
    mkdir -p /opt/relion/etc
    cat > /opt/relion/etc/slurm.conf << 'EOF'
ClusterName=gracehopper
SlurmctldHost=gracehopper-slurmctld(10.242.255.210)
SlurmctldHost=gracehopper-slurmctld-backup(10.242.255.211)
AuthType=auth/munge
GresTypes=gpu
EOF
    # Create qsub template
    cat > /opt/relion/etc/qsub_template.sh << 'EOF'
#!/bin/bash
#SBATCH --job-name=XXXnameXXX
#SBATCH --output=XXXoutfileXXX
#SBATCH --error=XXXerrfileXXX
#SBATCH --partition=XXXqueueXXX
#SBATCH --ntasks=XXXmpinodesXXX
#SBATCH --cpus-per-task=XXXthreadsXXX
#SBATCH --time=XXXextra1XXX
#SBATCH --nodes=XXXextra2XXX
#SBATCH --gpus-per-node=XXXextra3XXX

source /opt/cray/pe/lmod/lmod/init/profile
module load brics/apptainer-multi-node

CONTAINER=relion.sif
srun --mpi=pmi2 apptainer exec --nv --bind $PROJECTDIR --bind /usr/share/pmix $CONTAINER /host/adapt.sh bash -c 'export PATH=/opt/relion/bin:/opt/ctffind/bin:/opt/conda/envs/relion-5.0/bin:/opt/conda/bin:$PATH; XXXcommandXXX'
EOF
    chmod +x /opt/relion/etc/qsub_template.sh
    # Cleanup
    rm -rf /relion
    apt-get clean && rm -rf /var/lib/apt/lists/*
Or alternatively click here to download the file: relion.def
Then build the container on a compute node as below:
Running compute node jobs from the GUI
In this section we will show you how to launch the Relion GUI to interactivaly dispatch slurm jobs on compute nodes. The container built above is packaged with the Slurm configuration, so no additional scripts are needed to submit jobs from Relion.
First, let's ssh with X11 forwarding to a login node:
Note that we will do all the work for this guide in the $HOME/relion/relion_guide/ project directory. Ensure the container .sif file is available in this directory. We begin by downloading and unpacking the example data.
Now we can start relion on the login node, which will open the GUI on your local machine. When Relion asks if it should start a new project here select "Yes".
X11 Forwarding on MacOS
If you are using MacOS make sure you have an X utility installed such as XQuarts.
If the environment variable DISPLAY is not set this hints that you are missing this utility.
Starting an Import job
The left pane shows the types of jobs you can run. Click "Import" (at the top of the list).
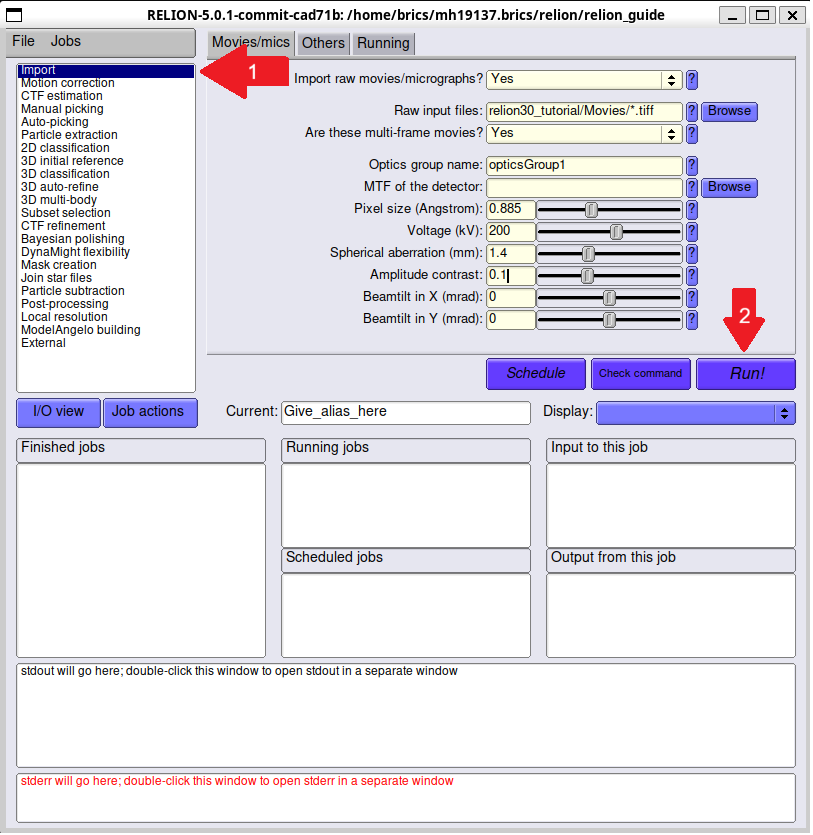
On the I/O tab:
- Raw input files:
relion30_tutorial/Movies/*.tiff - Are these multi-frame movies? Yes
- Pixel size (Å): 0.885
- Voltage (kV): 200
- Spherical aberration (mm): 1.4
- Amplitude contrast: 0.1
These parameters are defined in the test data. Run the job by pressing the Run! button.
If successful you should see the output:
Starting a Motion Correction Job
Once the Import job has run successfully, we now need to configure our test job which requires a few extra steps.
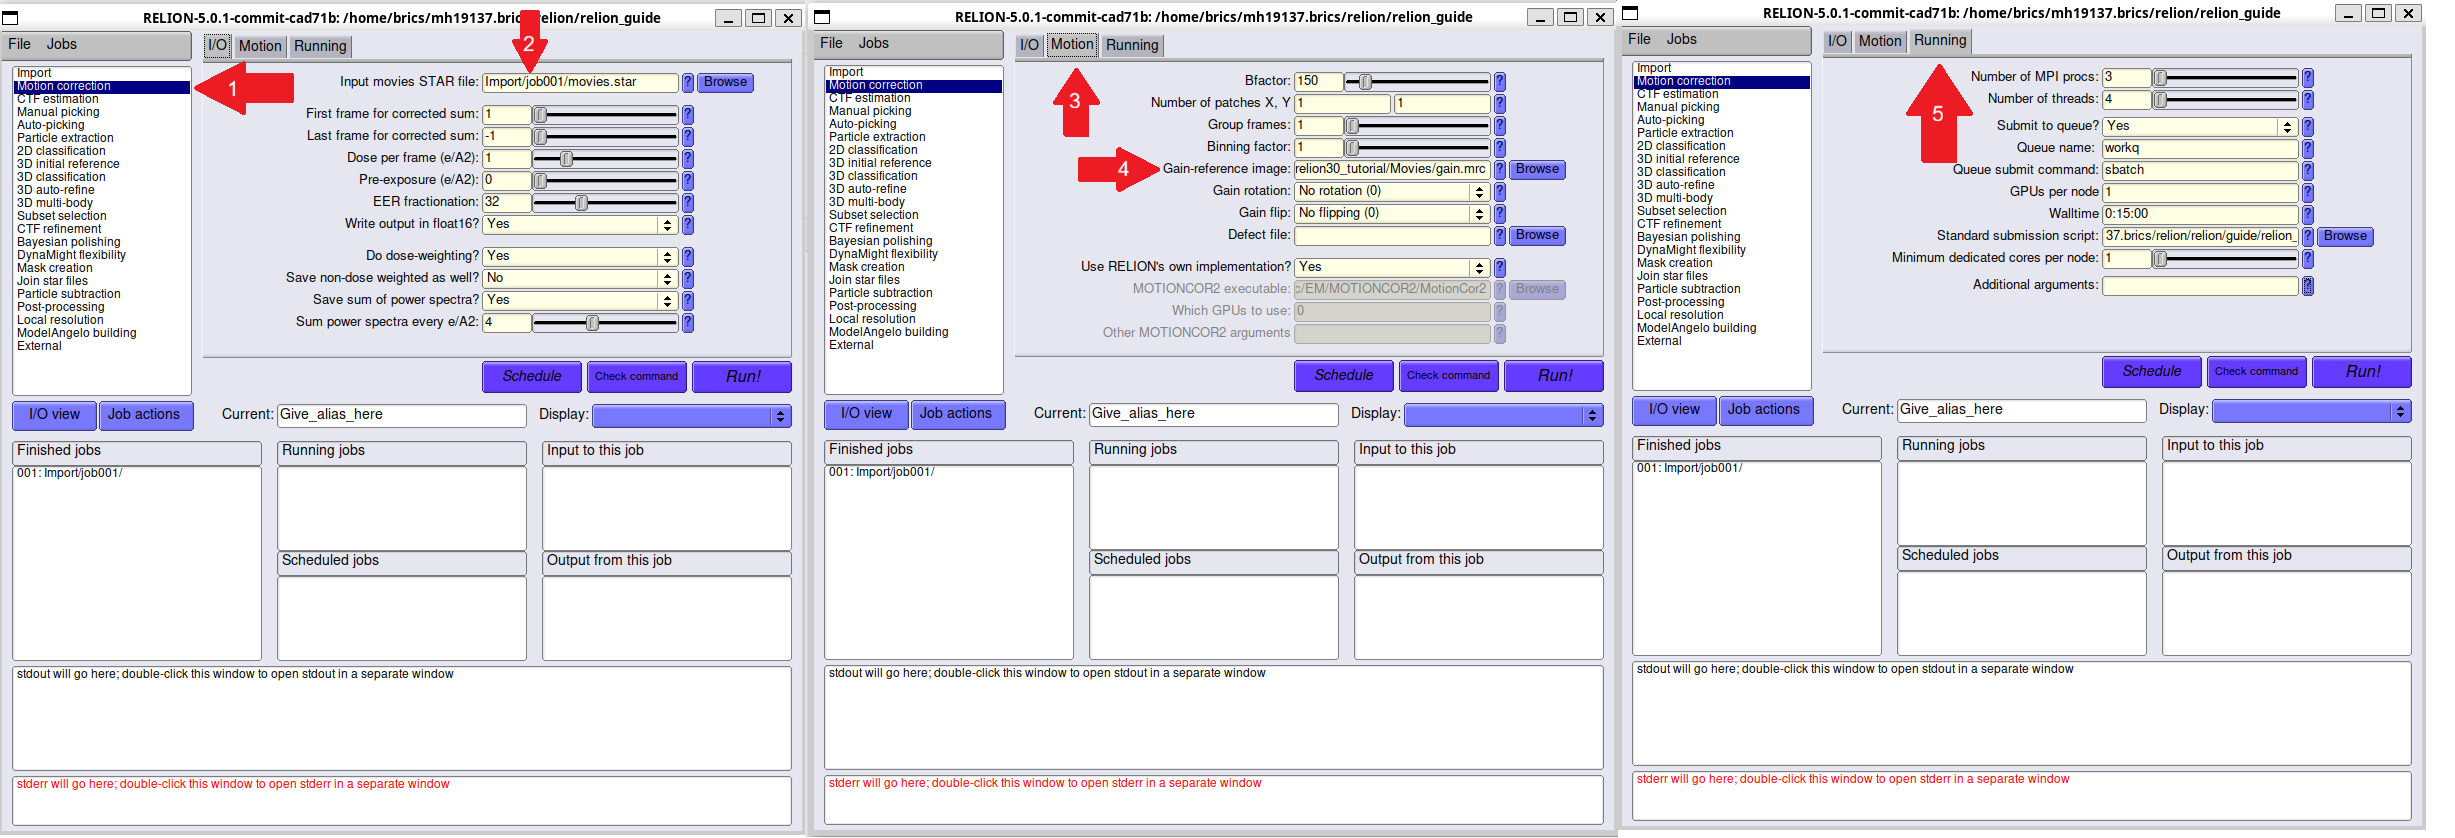
Select "Motion correction" on the left pane. On the I/O tab, set:
- Input movies STAR file: select
Import/job001/movies.star
On the Motion tab, set:
- Gain-reference image:
relion30_tutorial/Movies/gain.mrc
On the Running tab:
- Number of MPI procs: 3
- Number of threads: 4
- Submit to queue?: Yes
- Queue name: workq
- Walltime: 0:15:00
- Number of nodes: 1
- GPUs per node: 2
Click Run!
You should see "Submitted batch job ..." in your terminal output, and some outputs in the relion GUI.
If successful you should see the following:
  49/  56 sec ....................................................~~(,_,">    [oo]
  56/  56 sec ............................................................~~(,_,"> yum!
 Generating joint STAR file ...
000/??? sec ~~(,_,">                                                          [oo]
   0/   0 sec ............................................................~~(,_,"> yum!
 Written: MotionCorr/job003/corrected_micrographs.star
 Now generating logfile.pdf ...
 Done! Written: MotionCorr/job003/logfile.pdf